| 来包含他们:Library。类似于常用的库,Library 应该能够添加,删除和计算集合中的项。甚至,Library 还应该允许访问集合(本章中的样本代码部分可看到示例)中的单一的项(对象)。
我们开始构建 Library 的测试用例。
class LibraryTestCase extends UnitTestCase {
function TestCount() {
$lib = new Library;
$this->assertEqual(0, $lib->count());
}
}
它是满足这一测试的简单类:
class Library {
function count() {
return 0;
}
}
继续将一些有趣的功能添加到测试中:
class LibraryTestCase extends UnitTestCase {
function TestCount() { /* ... */ }
function TestAdd() {
$lib = new Library;
$lib->add(‘one’);
$this->assertEqual(1, $lib->count());
}
}
实现 add() 的简单方法是建立在 PHP 灵活数组函数的基础上:你可以将项添加到实例变量并使用 count() 来返回集合众项的数量。
class Library {
protected $collection = array();
function count() {
return count($this->collection);
}
function add($item) {
$this->collection[] = $item;
}
}
Library 现在是一个集合,但它没有提供检索或操纵单一数组成员的方法。
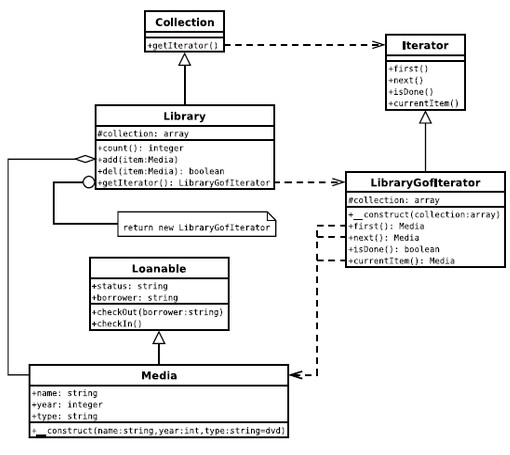
我们回到本章的重点,迭代器设计模式的实现。下列 UML 类图显示了 GoF 迭代器模式与 Media 和 Library 类结合使用巩固示例的方法。
? 你的集合类必须提供 Factory(参见第 3 章)来创建迭代器的实例。
? 迭代器类定义 first() 转到集合开始的接口,
next() 移到序列中的下一个项作为你的循环,currentItem() 从集合检索当前的项作为你的循环, isDone() 用于指出你在整个集合中循环结束的时间。
在“示例代码”部分,LibraryGofIterator 类是一个直接实现 GoF 迭代器设计模式的示例。
样本代码
在 Library 内实现 GoF 迭代器模式的第一步是为新的具体迭代器写一个新的测试用例。因为每一种测试方法都将操纵包含 Media 实例的 Library,你可以清空 UnitTestCase::setUp() 方法,从而在每种测试的已知状态下将变量填充到 Library 中。
首先,将 Library::getIterator() 方法作为LibraryGofIterator 类的 一个 Factory 实例。
class IteratorTestCase extends UnitTestCase {
protected $lib;
function setup() {
$this->lib = new Library;
$this->lib->add(new Media(‘name1’, 2000));
$this->lib->add(new Media(‘name2’, 2002));
$this->lib->add(new Media(‘name3’, 2001));
}
function TestGetGofIterator() {
$this->assertIsA($it = $this->lib->getIterator()
,’LibraryGofIterator’);
}
}
实现:
class Library {
// ...
function getIterator() {
return new LibraryGofIterator($this->collection);
}
}
getIterator() 方法将 Library 的 $collection 传递给新的具体迭代器结构。这一方法有两个重要的实现:每个迭代器都是独立的,因此可以同时操作多个迭代器。另外,迭代器在数组上的操作是当迭代器被请求时才执行的。如果之后将另一个项添加到集合中,你必须请求另一个迭代器来显示它(至少是在该实现中)。让我们通过将声明添加到 TestGetGofIterator() 方法以匹配迭代器设计模式,继续对测试进行加强。
如果你已经对整个集合进行遍历,则 isDone() 方法只应该为 true。如果 iterator 刚刚创建,则 isDone() 显然返回 false,从而指出集合可以遍历。
class IteratorTestCase extends UnitTestCase {
function setup() { /* ... */ }
function TestGetGofIterator() {
$this->assertIsA($it = $this->lib->getIterator()
,’LibraryGofIterator’);
$this->assertFalse($it->isdone());
}
}
与 TDD 一样,尽可能实现最简单的代码来满足你的测试用例:
class LibraryGofIterator {
function isDone() {
return false;
}
}
因此,在第一个迭代器间,应该发生什么呢? currentItem() 应该返回第一个 Media 对象,这个对象是在 IteratorTestCase::setUp() 方法中添加的,isDone() 应该继续为 false,因为另两个项仍然等待遍历。
class IteratorTestCase extends UnitTestCase {
function setup() { /* ... */ }
function TestGetGofIterator() {
$this->assertIsA($it = $this->lib->getIterator()
,’LibraryGofIterator’);
$this->assertFalse($it->isdone());
$this->assertIsA($first = $it->currentItem(), ‘Media’);
$this->assertEqual(‘name1’, $first->name);
$this->assertFalse($it->isdone());
}
}
LibraryGofIterator 接收了构造函数中的 $collection, 这一点非常重要(参见上面的 Library 最小化实现)并从 currentItem() 方法返回 current() 项。
class LibraryGofIterator {
protected $collection;
function __construct($collection) {
$this->collection = $collection;
}
function currentItem() {
return current($this->collection);
}
function isDone() {
return false;
}
}
在下一个迭代会出现什么? next() 方法应该更改currentItem() 方法返回的项。下面的测试捕获了所期望的行为:
class IteratorTestCase extends UnitTestCase {
function setup() { /* ... */ }
function TestGetGofIterator() {
$this->assertIsA($it = $this->lib->getIterator(), ‘LibraryGofIterator’);
$this->assertFalse($it->isdone());
$this->assertIsA($first = $it->currentItem(), ‘Media’);
$this->assertEqual(‘name1’, $first->name);
$this->assertFalse($it->isdone());
$this->assertTrue($it->next());
$this->assertIsA($second = $it->currentItem(), ‘Media’);
$this->assertEqual(‘name2’, $second->name);
$this->assertFalse($it->isdone());
}
}
重新建立在 PHP 的数组函数之上,在数组上使用 next():
class LibraryGofIterator {
protected $collection;
function __construct($collection) {
$this->collection = $collection;
}
function currentItem() {
return current($this->collection);
}
function next() {
return next($this->collection);
}
function isDone() {
return false;
}
}
除了 isDone() 方法必须返回 之外,第三个迭代看起来很像其他的迭代。你还希望 next() 能够成功移到下一个迭代:
class IteratorTestCase extends UnitTestCase {
function setup() { /* ... */ }
function TestGetGofIterator() {
$this->assertIsA($it = $this->lib->getIterator(), ‘LibraryGofIterator’);
$this->assertFalse($it->isdone());
$this->assertIsA($first = $it->currentItem(), ‘Media’);
$this->assertEqual(‘name1’, $first->name);
$this->assertFalse($it->isdone());
$this->assertTrue($it->next());
$this->assertIsA($second = $it->currentItem(), ‘Media’);
$this->assertEqual(‘name2’, $second->name);
$this->assertFalse($it->isdone());
$this->assertTrue($it->next());
$this->assertIsA($third = $it->currentItem(), ‘Media’);
$this->assertEqual(‘name3’, $third->name);
$this->assertFalse($it->next());
$this->assertTrue($it->isdone());
}
}
对 next() 和 isDone() 方法稍加修改,所有的测试都通过了。代码如下:
class LibraryGofIterator {
protected $collection;
function __construct($collection) {
$this->collection = $collection;
}
function first() {
reset($this->collection);
}
function next() {
return (false !== next($this->collection));
}
function isDone() {
return (false === current($this->collection));
}
function currentItem() {
return current($this->collection);
}
}
迭代器测试用例只存在一个问题:它没有反映迭代器的典型用法。是的,它测试了迭代器模式的所有功能,但应用程序需要采用更简单的方法来使用迭代器。因此,下一步是使用更贴实际的代码来编写测试。
class IteratorTestCase extends UnitTestCase {
protected $lib;
function setup() { /* ... */ }
function TestGetGofIterator() { /* ... */ }
function TestGofIteratorUsage() {
$output = ‘’;
for ($it=$this->lib->getIterator(); !$it->isDone(); $it->next()){
$output .= $it->currentItem()->name;
}
$this->assertEqual(‘name1name2name3’, $output);
}
}
目前,迭代器的实现复制了某个数组(集合),并使用 PHP 的内部指针来跟踪迭代。你还可以通过自己跟踪集合索引来实现迭代器。这需要 Library 中的一种新的 accessor 方法来通过关键字访问对象。
class Library {
// ...
function get($key) {
if (array_key_exists($key, $this->collection)) {
return $this->collection[$key];
}
}
}
同样,在 Library::getIterator() 方法中,你可能将 $this(library 本身)传递给构造程序,而不是将 $this 传递给集合(数组包含Media 集合)。外部的迭代器然后只是内部地跟踪指针以了解它当前引用的是哪一个 Library 集合元素,并将使用构造行数中从引用到 Library 的传递来检索当前的对象。
class LibraryGofExternalIterator {
protected $key = 0;
protected $collection;
function __construct($collection) {
$this->collection = $collection;
}
function first() {
$this->key=0;
}
function next() {
return (++$this->key < $this->collection->count());
}
function isDone() {
return ($this->key >= $this->collection->count());
}
function currentItem() {
return $this->collection->get($this->key);
}
}
这一实现假设你的集合数组从 0 开始建立索引,并且是完全连续的。
不同的迭代器 API
虽然前面的代码是 GoF 所述迭代器模式的完整实现,你还可能会发现四种方法的 API 有一点臃肿。如果是,你可以将 collapse next(), currentItem(), 和 isDone() 都并入 next() 中,用来从集合中返回本项或下一项,或者如果整个集合被遍历过了,则返回 false。这是一个测试不同 API 的代码:
class IteratorTestCase extends UnitTestCase {
// ...
function TestMediaIteratorUsage() {
$this->assertIsA(
$it = $this->lib->getIterator(‘media’)
,’LibraryIterator’);
$output = ‘’;
while ($item = $it->next()) {
$output .= $item->name;
}
$this->assertEqual(‘name1name2name3’, $output);
}
}
在上述代码中,注意简化的循环控制结构。 next() 返回对象或者false,允许你在 while 循环条件中执行分配。下面的一些示例检验使用较小接口的不同迭代器模式。为了方便,将 Library::getIterator() 方法更改为参数化的 Factory,以便你可以从单一方法中获取四种的方法迭代器或两种方法的迭代器(next() 和 reset())。
class Library {
// ...
function getIterator($type=false) {
switch (strtolower($type)) {
case ‘media’:
$iterator_class = ‘LibraryIterator’;
break;
default:
$iterator_class = ‘LibraryGofIterator’;
}
return new $iterator_class($this->collection);
}
}
这里面的 Library::getIterator() 现在接受一个参数以选择返回什么样的迭代器。缺省为 LibraryGofIterator(因此现有的测试仍然能够通过)。将字符串媒体传递给所创建的方法,并返回 LibraryIterator。这是一些实现 LibraryIterator 的代码:
class LibraryIterator {
protected $collection;
function __construct($collection) {
$this->collection = $collection;
}
function next() {
return next($this->collection);
}
}
请注意调试结果的红色标记!什么导致发生错误“Equal expectation fails at character 4 with name1name2name3 and name2name3”?不知何故,跳过了第一次迭代 - 这是 bug。要修订该错误,对于 next() 方法的第一次调用,返回 current()。
class LibraryIterator {
protected $collection;
protected $first=true;
function __construct($collection) {
$this->collection = $collection;
}
function next() {
if ($this->first) {
$this->first = false;
return current($this->collection);
}
return next($this->collection);
}
}
Presto! 绿色条和改进的 while 循环迭代器。
过滤迭代器
利用迭代器,你不仅仅可以显示集合中的每一项。你还可以选择显示的项。修改 Library::getIterator() 来使用其它两种迭代器类型。
class Library {
// ...
function getIterator($type=false) {
switch (strtolower($type)) {
case ‘media’:
$iterator_class = ‘LibraryIterator’;
break;
case ‘available’:
$iterator_class = ‘LibraryAvailableIterator’;
break;
case ‘released’:
$iterator_class = ‘LibraryReleasedIterator’;
break;
default:
$iterator_class = ‘LibraryGofIterator’;
}
return new $iterator_class($this->collection);
}
}
类 LibraryAvailableIterator 仅可以迭代状态为“library”的项”(重新调用 checkOut() 方法,将状态更改为“borrowed”)。
class IteratorTestCase extends UnitTestCase {
// ...
function TestAvailableIteratorUsage() {
$this->lib->add($dvd = new Media(‘test’, 1999));
$this->lib->add(new Media(‘name4’, 1999));
$this->assertIsA(
$it = $this->lib->getIterator(‘available’)
,’LibraryAvailableIterator’);
$output = ‘’;
while ($item = $it->next()) {
$output .= $item->name;
}
$this->assertEqual(‘name1name2name3testname4’, $output);
$dvd->checkOut(‘Jason’);
$it = $this->lib->getIterator(‘available’);
$output = ‘’;
while ($item = $it->next()) {
$output .= $item->name;
}
$this->assertEqual(‘name1name2name3name4’, $output);
}
}
该测试创建一个新的介质实例,并将其存储在变量 $dvd 中。突出显示第一个 assertEqual() 声明验证利用 LibraryAvailableIterator 进行迭代时,存在一个新的项。接下来,测试使用 checkOut() 方法,并验证新的项已丢失,不显示。实现过滤得代码非常类似于 LibraryIterator::next(),差别在于在返回项之前执行过滤。如果当前项与过滤条件不匹配,则代码返回 $this->next()。
class LibraryAvailableIterator {
protected $collection = array();
protected $first=true;
function __construct($collection) {
$this->collection = $collection;
}
function next() {
if ($this->first) {
$this->first = false;
$ret = current($this->collection);
} else {
$ret = next($this->collection);
}
if ($ret && ‘library’ != $ret->status) {
return $this->next();
}
return $ret;
}
}
排序迭代器
迭代器不仅可以显示全部或部分集合。而且,还可以按特定顺序显示集合。下面,创建一个按集合众介质的发布日期进行排序的迭代器。为了进行测试,请添加某些日期在 setUp() 方法中添加的项之后的介质实例。如果迭代器运行,则这些日期较后的项应该位于迭代操作的最前面。
class IteratorTestCase extends UnitTestCase {
// ...
function TestReleasedIteratorUsage() {
$this->lib->add(new Media(‘second’, 1999));
$this->lib->add(new Media(‘first’, 1989));
$this->assertIsA(
$it = $this->lib->getIterator(‘released’)
,’LibraryReleasedIterator’);
$output = array();
while ($item = $it->next()) {
$output[] = $item->name .’-’. $item->year;
}
$this->assertEqual(
‘first-1989 second-1999 name1-2000 name3-2001 name2-2002’
,implode(‘ ‘,$output));
}
}
该测试使用的项在每个迭代中略有不同:并不仅仅是在字符串值后添加 $name,而是,字符串同时具有 $name 和 $year 属性,这些属性随后将被添加到 $output 数组。LibraryReleasedIterator 的实现与 LibraryIterator 非常类似,除了 constuctor 中的一行语句:
class LibraryReleasedIterator extends LibraryIterator {
function __construct($collection) {
usort($collection, create_function(‘$a,$b’,’ return ($a->year - $b->year);’));
$this->collection = $collection;
}
}
用粗体表示的这一行将 $collection 数组排在迭代之前。你可以通过简单地继承 LibraryIterator 类,来避免复制该类的其它所有代码。可以使用外部迭代器来实现相同的排序迭代吗?是的,但是你必须注意完成它的诀窍。
class LibraryReleasedExternalIterator {
protected $collection;
protected $sorted_keys;
protected $key=-1;
function __construct($collection) {
$this->collection = $collection;
$sort_funct = create_function(
‘$a,$b,$c=false’,
‘static $collection;
if ($c) {
$collection = $c;
return;
}
return ($collection->get($a)->year -
$collection->get($b)->year);’);
$sort_funct(null,null,$this->collection);
$this->sorted_keys = $this->collection->keys();
usort($this->sorted_keys, $sort_funct);
}
function next() {
if (++$this->key >= $this->collection->count()) {
return false;
} else {
return $this->collection->get($this->sorted_keys[$this->key]);
}
}
}
其中,关键是创建用于排序的实用程序函数。排序函数必须能够访问集合,以便可以获取对照成员。然而,因为 gener- ated 函数在 usort() 中使用,没有将集合作为其它参数传递的选项。相反,你可以利用上述代码块中显示的诀窍,在利用 usort() 调用函数之前,将引用存储在函数中内部的集合中。排序的项是集合的关键字列表。当 usort() 完成时,关键字会按照集合中每个对象的 year 属性的顺序进行排序。在 next() 方法中,可以通过 get() 方法访问集合中的对象,而不是间接通过 $sorted_keys 映射。如果重新调用外部版本的 GoF 风格的迭代器,则不连续的数组或关键字中的字符串可能会有问题。可以使用针对 sim- ple 外部迭代器的相同诀窍,来减少关键字顺序不连贯的问题。
SPL 迭代器
《迭代器设计模式和 PHP》中必须论述“标准 PHP 库”(SPL)迭代器。虽然,使用 while 循环结构可以非常紧凑,并且也很有用,但是 PHP 代码或许更适合数组迭代的 foreach 结构。直接在 foreach 循环中使用集合合适吗?这其实就是 SPL 迭代器的目标。(尽管本章整篇都是写 PHP5,下列 SPL 代码只能在 PHP5 中运行,并且仅当在 PHP5 编译中将 SPL 启用。)
Fuecks 写过一篇文章,详细地介绍了 SPL 和 SPL 迭代器;请参阅。使用 SPL 是一种完全不同的实现迭代的方法,因此首先介绍一个新单元测试例子和一个新的类 ForeachableLibrary。
class SplIteratorTestCase extends UnitTestCase {
protected $lib;
function setup() {
$this->lib = new ForeachableLibrary;
$this->lib->add(new Media(‘name1’, 2000));
$this->lib->add(new Media(‘name2’, 2002));
$this->lib->add(new Media(‘name3’, 2001));
}
function TestForeach() {
$output = ‘’;
foreach($this->lib as $item) {
$output .= $item->name;
}
$this->assertEqual(‘name1name2name3’, $output);
}
}
ForeachableLibrary 是实现 SPL 迭代器接口的集合。你必须执行 5 个函数来创建 SPL 迭代器:current()、next()、key()、valid() 和 rewind()。 key() 返回集合的当前索引。 rewind() 类似于 reset():在集合启动时重新启动迭代。
class ForeachableLibrary
extends Library implements Iterator {
protected $valid;
function current() {
return current($this->collection);
}
function next() {
$this->valid = (false !== next($this->collection));
}
function key() {
return key($this->collection);
}
function valid() {
return $this->valid;
}
function rewind() {
$this->valid = (false !== reset($this->collection));
}
}
这里,该代码仅仅实现了处理 $collection 属性的必需的函数。(如果你没有实现所有 5 个函数,并且将实现迭代器添加到类 definition,则 PHP 将出现致命错误。)测试尚不成熟,因此,什么都有可能发生。存在一个问题:事实受限于一种迭代类型 - 排序,或者 fil- tering 不可用。可以采取措施来调整这种情况?是的!应用从策略模式中学到的知识(请参阅第 7 章),将 SPL 迭代器的 5 个函数作为另一个对象的示例。这是关于 PolymorphicForeachableLibrary 的测试。
class PolySplIteratorTestCase extends UnitTestCase {
protected $lib;
function setup() {
$this->lib = new PolymorphicForeachableLibrary;
$this->lib->add(new Media(‘name1’, 2000));
$this->lib->add(new Media(‘name2’, 2002));
$this->lib->add(new Media(‘name3’, 2001));
}
function TestForeach() {
$output = ‘’;
foreach($this->lib as $item) {
$output .= $item->name;
}
$this->assertEqual(‘name1name2name3’, $output);
}
}
这种情况与 SplIteratorTestCase 测试的唯一差别在于 $this->lib 属性类是在 setUp() 方法中创建的。这意味着:这两个类的运行方式必须一致。PolymorphicForeachableLibrary:class PolymorphicForeachableLibrary扩展库
implements Iterator {
protected $iterator;
function current() {
return $this->iterator->current();
}
function next() {
return $this->iterator->next();
}
function key() {
return $this->iterator->key();
}
function valid() {
return $this->iterator->valid();
}
function rewind() {
$this->iterator =
new StandardLibraryIterator($this->collection);
$this->iterator->rewind();
}
}
扩展库加入集合处理方法。并添加 SPL 方法,这些方法代表了 $iterator 属性,在 rewind() 中创建。以下是StandardLibraryIterator 的代码。
class StandardLibraryIterator {
protected $valid;
protected $collection;
function __construct($collection) {
$this->collection = $collection;
}
function current() {
return current($this->collection);
}
function next() {
$this->valid = (false !== next($this->collection));
}
function key() {
return key($this->collection);
}
function valid() {
return $this->valid;
}
function rewind() {
$this->valid = (false !== reset($this->collection));
}
}
该代码看起来很熟悉:实际上,这来自于 5 个 SPL 函数ForeachableLibrary 类。
测试类
现在,代码更加复杂了,但是其如何支持其它迭代器类型?添加一个关于“发行版”迭代器的测试,来查看这种设计的其它迭代器如何工作。
class PolySplIteratorTestCase extends UnitTestCase {
// ...
function TestReleasedForeach() {
$this->lib->add(new Media(‘second’, 1999));
$this->lib->add(new Media(‘first’, 1989));
$output = array();
$this->lib->iteratorType(‘Released’);
foreach($this->lib as $item) {
$output[] = $item->name .’-’. $item->year;
}
$this->assertEqual(
‘first-1989 second-1999 name1-2000 name3-2001 name2-2002’
,implode(‘ ‘,$output));
}
}
上面的测试用例看起来也很熟悉,因为其非常类似于前一个“发行版”迭代器,但是使用了 foreach 控制结构进行循环。
class PolymorphicForeachableLibrary
extends Library implements Iterator {
protected $iterator_type;
protected $iterator;
function __construct() {
$this->iteratorType();
}
function iteratorType($type=false) {
switch(strtolower($type)) {
case ‘released’:
$this->iterator_type = ‘ReleasedLibraryIterator’;
break;
default:
$this->iterator_type = ‘StandardLibraryIterator’;
}
$this->rewind();
}
// ...
function rewind() {
$type = $this->iterator_type;
$this->iterator = new $type($this->collection);
$this->iterator->rewind();
}
}
新的 iteratorType() 方法使你转变要使用的迭代器的类型。(因为迭代器类型并不是在对象安装期间选中的,并且你可以在空闲时再次调用 iteratorType() 方法来选择不同迭代器类型,所以实际上是在 State 模式执行代码,而不是 Strategy 模式。)
class ReleasedLibraryIterator
extends StandardLibraryIterator {
function __construct($collection) {
usort($collection
,create_function(‘$a,$b’,’return ($a->year - $b->year);’));
$this->collection = $collection;
}
}
你可以简单地通过扩展 StandardLibraryIterator 并覆盖构造函数来添加入局数组的排序,从而实现 ReleasedLibraryIterator。并且,通过它,你可以有一个 working PolymorphicForeachableLibrary。
总结
迭代器是标准化地地处理应用程序中对象集合的方法。这些例子是基于数组的,但是对于拥有同一个接口的非数组集合,工作起来将更加强大。使用 foreach 控制结构方式的集合确实非常酷。 SPL 实现中最不幸的问题是与迭代器可能存在的名称空间冲突。有多少 PHP4 面向对象的代码拥有类似于迭代器类作为库迭代器类的基类?在一些容量中有多少 5 种必需方法的定义?可能一个更加具有深刻含义的名称就能实现 Foreachable。如果你选择使用 SPL,则还应该研究其它支持的迭代器,例如RecursiveArrayIterator 和其它众多迭代器。 |

